English
 中文简体
中文简体 Español
 svenska


Content
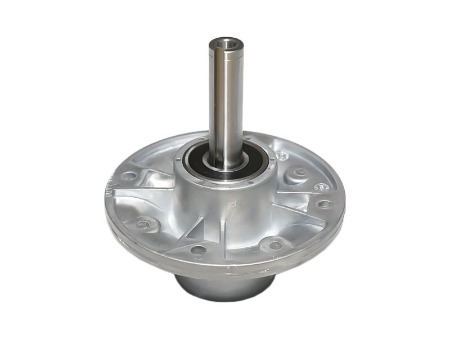
Understanding Tolerances and Alignment in Precision Spindle Assembly
In any high-precision rotating system, the margin for error is measured in microns rather than millimeters, and the relationship between geometry, stiffness, thermal behavior, and damping decides whether a spindle reliably reaches its rated speed, torque, and surface-finish targets. When engineers talk about precision spindle assembly tolerances and alignment, they are referring not only to the nominal fits between shaft journals, bearings, collars, spacers, and housings but also to how those components remain coaxial and coplanar under real thermal and dynamic loads. A misalignment that looks trivial at rest becomes a source of heat and chatter once the rotor spins, so the tolerance stack must be validated in both static and operating states.
Key geometric controls that drive performance
Several geometric controls dominate practical outcomes. Radial runout of the taper or tool interface affects cutting accuracy and tool life, while axial runout degrades surface finish and causes waviness. Bearing seat roundness and taper angle accuracy maintain proper contact stress distribution; if the seat deviates, preload shifts toward point contact that accelerates wear. Housing bore straightness ensures the outer ring is not skewed, because even a few microns of tilt lead to uneven load sharing across rolling elements, elevating vibration and reducing fatigue life. The alignment of the motor rotor to the spindle shaft is also critical in motorized designs, as magnetic pull must remain centered to avoid parasitic bending moments that masquerade as imbalance.
Metrology strategy and stack-up verification
Because tolerances interact, a robust metrology plan measures individual features and then validates the assembled stack. Gauge blocks and master arbors verify taper geometry; air gaging can expose subtle bore lobing that contact probing might miss. A precision V-block with a roundness tester helps differentiate shaft roundness error from bearing-induced runout. Thermal preconditioning—allowing components to soak to the same temperature—prevents false readings caused by differential expansion. Engineers often compare a “blueprint build,” where parts are assembled as-is, to a “selective assembly,” where matched pairs minimize the worst stack directions; the latter reliably reduces total indicated runout even when individual features already meet print.
When to tighten versus relax tolerances
Tighter tolerances reduce geometric error but increase cost and the risk of assembly damage due to forced fits. In low-speed, high-load applications, generous clearances with robust lubrication may outperform ultra-tight fits that invite scuffing. Conversely, high-speed finishing spindles gain disproportionately from sub-micron taper and seat accuracy. In practice, teams often pilot-build two variants—one using catalog fits and one with selective pairing and micro-lapping—to compare thermal growth, current draw, and spectrum peaks. When the selectively paired build shows lower synchronous vibration and less heat at identical preload, the cost of added metrology often pays for itself via longer bearing life and better yield.
Comparison: Radial vs. Axial Runout Effects (narrative)
As a rule of thumb, radial runout primarily affects tool tip location accuracy and generates circularity error, while axial runout introduces face wobble that appears as surface waviness. If the radial runout is halved while axial runout is unchanged, circular features improve more than planar faces; if axial runout is halved while radial runout is unchanged, face milling improves more than boring. In very high-speed regimes, both couple with imbalance and bearing stiffness to shape the final spectrum, so balancing alone cannot hide a crooked taper.
| Aspect | Radial Runout | Axial Runout |
|---|---|---|
| Primary impact | Hole roundness, tool tip location | Face flatness, surface waviness |
| Typical root causes | Taper eccentricity, shaft bend, seat lobing | Face squareness, spacer error, axial play |
| Detection | Indicator on taper OD / master bar | Indicator on spindle face / reference disk |
| Mitigation | Selective assembly, micro-lapping, regrind | Face grind, spacer correction, preload tune |
In summary, treating tolerances and alignment as a system—rather than a collection of isolated print numbers—produces quieter spectra, cooler operation, and markedly better finish at the spindle nose.
Best Practices for High-Speed Spindle Balancing
Even a perfectly aligned spindle can fail at speed if the rotor is not balanced across the operating range. The phrase high-speed spindle balancing best practices encompasses rotor design choices, correction methodology, and validation under thermal and magnetic loads. Because modern rotors run above the first critical speed, you must consider not just static and couple imbalance but also mode shapes, thermal bow, and rotor growth during heat soak. Balancing is therefore not a one-time production step; it is a process that extends from component balancing through trim balancing in the assembled state.
Component, assembly, and trim balancing
Balancing begins at the component level: the shaft, chuck/taper nose, motor rotor, and spacers each receive preliminary correction so the assembly starts close to target. After bearings are mounted, an assembly balance at low speed removes residual couple that component steps cannot see. Finally, trim balancing at the intended operating speed accounts for thermal bow and magnetic pull in motorized designs. If the trim step is skipped, the rotor may pass inspection on a bench yet vibrate in the machine once current and heat add asymmetry.
Measurement practices that prevent false correction
Use rigid, repeatable fixturing with phase reference marks, and let the rotor reach a stable temperature before recording vectors. Filtering out structural resonances prevents chasing peaks unrelated to imbalance. Always re-run a verification spin after adding correction mass; if the spectrum shifts but the main 1× peak remains, you likely changed stiffness rather than balance. Because thin rotors are sensitive to mass placement, match correction radius to where the imbalance physically resides instead of spreading weight arbitrarily.
Single-plane vs. two-plane balancing (narrative + table)
For narrow rotors operating well below the first critical speed, single-plane correction is often sufficient; however, most spindles are long relative to diameter and experience couple imbalance that single-plane methods cannot cancel. Two-plane balancing gives control over both static and couple components, yielding a cleaner spectrum and lower bearing loads at high speed. Teams sometimes start with single-plane for speed, then escalate to two-plane if the couple vector refuses to fall below spec.
| Criteria | Single-Plane | Two-Plane |
|---|---|---|
| Best for | Short, stiff rotors below critical | Long rotors, above or near critical |
| Setup time | Low | Moderate |
| Residual imbalance | Higher couple residuals likely | Lower overall residuals |
| Bearing load at speed | Potentially higher | Typically lower |
Practical checklist before calling balance “done”
- Mark all correction positions and record vectors for traceability.
- Confirm repeatability with at least two independent spins.
- Verify that the 1× peak reduction persists after thermal soak.
- Inspect that correction hardware cannot loosen under centrifugal load.
Balancing validated at speed, with temperature stabilized, consistently delivers lower noise floors and measurably longer bearing life than quick, room-temperature bench corrections.
Calculating Bearing Preload for Spindle Performance
Preload sets the initial internal load on angular contact or tapered roller bearings to eliminate axial play, increase stiffness, and elevate first-mode frequency. The art—and science—of preload selection is why many teams refer to a spindle bearing preload calculation guide rather than relying on guesswork. Too little preload allows micro-slip and fretting; too much preload raises heat generation, risks lubricant starvation, and shortens fatigue life. The “correct” value depends on bearing type, contact angle, pitch diameter, lubricant, speed factor, and expected duty cycle.
Thermal growth and the moving target problem
As the spindle warms, the shaft often expands more than the housing, especially in motorized designs where rotor losses heat the inner path. This differential expansion increases effective preload over time. A calculation that ignores thermal rise may look perfect at room temperature but become excessive after ten minutes at speed. Engineers compensate using spring (constant force) preloads or by matching materials and fits so thermal drifts are minimized. Instrumented pilots that log axial displacement during heat-soak give early warning if preload ramp rates exceed plan.
Axial stiffness vs. heat trade-off (narrative + table)
Raising preload improves stiffness and reduces axial motion under cutting forces, but it also increases friction and temperature. In finishing operations where tool pressure is low and accuracy is paramount, a lighter preload with higher contact angle can achieve comparable stability with less heat. In roughing, a medium preload may offer a better balance. If a spindle runs uncomfortably hot in mid-range speeds, a common experiment is to back off preload by a small, measured amount and re-plot temperature versus speed; if heat falls with minimal stiffness loss, the spindle was over-preloaded.
| Preload Class | Axial Stiffness | Heat Generation | Typical Use |
|---|---|---|---|
| Light | Moderate | Low | High-speed finishing, fragile tools |
| Medium | High | Moderate | General purpose, mixed duty |
| Heavy | Very High | High | Low-speed, heavy cutting or grinding thrust |
Preload calculation steps you can trust
- Define operating envelope: speed, radial/axial loads, and duty cycle.
- Gather bearing data: contact angle, ball diameter, dynamic ratings, and stiffness curves.
- Estimate thermal gradients from motor losses and churning.
- Select preload class and method (rigid spacer vs. spring set); compute resulting axial deflection and contact stress.
- Simulate temperature rise and repeat calculations at operating temperature.
- Validate with test runs, monitoring current draw, temperature, and vibration.
By closing the loop between calculation and instrumented tests, teams avoid both chatter caused by under-preload and premature failures caused by over-preload.
Troubleshooting Runout in Motorized Spindles
When total indicated runout rises unexpectedly in service, shops often blame toolholders first. While that’s sensible, motorized spindles add unique failure paths: magnetic center misalignment, rotor eccentricity, thermally bowed shafts, and encoder mis-cue can all masquerade as geometric error. That is why a disciplined motorized spindle runout troubleshooting workflow compares cold and hot measurements, electrical and mechanical indicators, and free-spin versus driven states. If runout grows only when energized, magnetic pull and rotor growth are suspects; if it is present cold and hot, geometry or bearing damage is more likely.
Segregate the sources before you act
Begin with a clean master tool and measure taper and face runout at rest; then measure again at temperature after a controlled heat-soak so you can separate geometric error from thermal effects. Next, observe the vibration spectrum at 1× and bearing defect frequencies; a dominant 1× that changes with balance weights suggests imbalance, while fixed frequency sidebands suggest mechanical looseness or torque ripple. If runout increases with spindle orientation, gravity-induced sag or shaft bend may be present.
Corrective actions arranged by cause (narrative + table)
When misalignment between motor magnetic center and mechanical center is the culprit, a trim balance alone will not solve the problem; you must realign the rotor or adjust air gap shimming. If the spectrum highlights ball pass frequencies, a bearing replacement is probably due. If heat correlates with runout drift, reducing preload or improving cooling often stabilizes the system. Operators sometimes compare two repairs—one that replaces bearings only and one that includes rotor alignment—and the latter repeatedly delivers lower residual runout because it attacks the underlying physics rather than symptoms.
| Symptom | Likely Cause | Action |
|---|---|---|
| Runout grows only when powered | Magnetic center offset, rotor eccentricity | Realign rotor, verify air gap, re-balance at speed |
| Hot runout > cold runout | Thermal bow, preload increase with temperature | Improve cooling, adjust preload strategy |
| 1× peak dominates, phase consistent | Residual imbalance | Two-plane trim balance at operating rpm |
| Sidebands at defect frequencies | Bearing wear or damage | Replace bearings, inspect seats and lubrication |
Diagnostic checklist that speeds resolution
- Measure TIR cold and after defined heat-soak; record both.
- Capture vibration spectrum and phase; note changes with load.
- Swap to a certified master tool to eliminate holder variables.
- Log axial displacement to detect preload growth over time.
Following this sequence narrows the root cause quickly, reducing downtime and preventing repeat failures.
Cleanroom Procedures That Protect Precision During Assembly
Contamination is the invisible enemy of spindle life. A speck of dust on a bearing seat can distort contact stress enough to seed early failure, while fiber shedding from wipes can migrate into lubricant channels and starve the raceways. For that reason, disciplined cleanroom procedures for spindle assembly are not optional—they are the bedrock of reliable performance. The goal is to prevent particulate ingress, control humidity and electrostatic discharge, and ensure every tool and component meets cleanliness levels before entering the assembly zone.
Room classification, gowning, and behavior
Choose a room class appropriate to your risk tolerance; many shops assemble in ISO Class 7, while ultra-high-speed or vacuum spindles benefit from Class 6 practices. Regardless of class, enforce gowning protocols (hood, mask, gloves, shoe covers) and slow, deliberate movement to minimize particle shedding. Clean incoming parts with approved solvents, dry with filtered air, and double-bag until use. Track particle counts and temperature/humidity continuously; a modest increase in humidity reduces ESD risk and fibers floating in the air.
Tools and consumables that will not undo your work
Non-linting wipes, filtered oils, antistatic mats, and dedicated, cleaned torque tools are mandatory. A labeled tool cart that never leaves the room prevents cross-contamination. Use vacuum pickups rather than fingers when possible; gloves protect parts but can still transfer particles. Inspect seats with bright, raking light and a clean-room-rated borescope. Keep adhesives and sealants capped; outgassing and mist can leave films that interfere with lubrication. If a component is dropped, it is quarantined, cleaned, and re-inspected rather than “wiped off” and reused.
Cleanroom class selection and impact (narrative + table)
Moving from Class 8 to Class 7 reduces typical airborne particle counts by an order of magnitude, which directly lowers the chance that a particle will be trapped under a bearing ring during seating. Class 6 goes further but at higher operational cost. Many teams pilot in Class 7 and adopt Class 6 only for the bearing mounting step, gaining most of the benefit with limited overhead. Compared to uncontrolled assembly, either class dramatically improves first-pass yield and stabilizes temperature during run-in because cleaner seats roll smoother.
| ISO Class | Typical Use | Pros | Considerations |
|---|---|---|---|
| Class 8 | General mechanical prep | Lower cost, easier access | Higher particle risk; limit to non-critical tasks |
| Class 7 | Standard spindle assembly | Good balance of cleanliness and cost | Requires disciplined gowning and monitoring |
| Class 6 | High-speed bearing mounting | Best protection for rolling elements | Higher cost; stricter training |
Clean assembly checklist
- Bag and tag cleaned parts with lot/date for traceability.
- Measure particle counts before, during, and after critical steps.
- Use filtered, temperature-controlled air for drying; avoid unfiltered blow-offs.
- Document torque values and tool calibrations within the room.
Spindles built with rigorous cleanliness consistently show lower run-in temperatures and longer bearing life, validating the investment in procedure and discipline.